Create a table in Azure Data Explorer: You can use the Azure Data Explorer Web UI, Azure CLI, or Azure PowerShell to create a table. The table should have the same structure as the CSV file you want to ingest.
Upload the CSV file to Azure Blob Storage: You can use the Azure portal or Azure Storage Explorer to upload the CSV file to Azure Blob Storage.
Create a data connection in Azure Data Explorer: You can use the Azure Data Explorer Web UI or Azure PowerShell to create a data connection to the Azure Blob Storage container where the CSV file is located.
Define an ingestion mapping: You can use the Azure Data Explorer Web UI or Azure PowerShell to define an ingestion mapping that maps the columns in the CSV file to the columns in the Azure Data Explorer table.
Ingest the data: You can use the Azure Data Explorer Web UI or Azure PowerShell to start the ingestion process. The ingestion process will read the CSV file from Azure Blob Storage, apply the ingestion mapping, and write the data to the Azure Data Explorer table.
Below is an example PowerShell script that ingests data from a CSV file into Azure Data Explorer:
This blog post is about another method of ingesting data into Azure Data Explorer.
Azure Stream Analytics is a cloud-based stream processing service that allows us to ingest and process real-time data from various sources. We can use Azure Stream Analytics to ingest data into Azure Data Explorer in real-time. Here’s how:
Create an Azure Data Explorer Table: The first step is to create a table in Azure Data Explorer that will receive the real-time data.
Create an Azure Stream Analytics Job: The next step is to create an Azure Stream Analytics job that will ingest the data and send it to the Azure Data Explorer table. You will need to specify the input source of the real-time data and the output destination of the data in Azure Data Explorer.
Define a Query: In the Azure Stream Analytics job, you will need to define a query that transforms the real-time data and sends it to Azure Data Explorer.
Start the Azure Stream Analytics Job: Once you have defined the query, you can start the Azure Stream Analytics job. The job will ingest the real-time data and send it to Azure Data Explorer.
Azure Stream Analytics provides us a very user-friendly interface that allows us to monitor the job and troubleshoot any issues.
This has to be one of the easiest ways (outside of ingesting csv) to get data into Azure Data Explorer for us to play around with.
Azure Data Explorer is a powerful analytics service that allows us to quickly ingest, store, and analyze large volumes of data from various sources. Azure Data Factory is a cloud-based data integration service that allows us to create data pipelines that can move and transform data from various sources to various destinations.
This blog post is about how integrating Azure Data Explorer with Azure Data Factory, we can easily ingest and process data from various sources into Azure Data Explorer.
Here’s how we can integrate Azure Data Explorer with Azure Data Factory:
Create a Data Factory: The first step is to create an Azure Data Factory in your Azure subscription.
Create a Linked Service: The next step is to create a Linked Service that connects to your Azure Data Explorer instance. This Linked Service will contain the connection details for your Azure Data Explorer instance.
Create a Dataset: Once you have created the Linked Service, you need to create a Dataset that specifies the location and format of your source data.
Create a Pipeline: The final step is to create a Pipeline that specifies the flow of data from the source to the Azure Data Explorer instance. The Pipeline contains the activities that will transform and move the data.
Add the Azure Data Explorer Sink: Within the Pipeline, you need to add an Azure Data Explorer Sink that will specify the destination of the data in Azure Data Explorer.
Configure the Sink: You will need to configure the Azure Data Explorer Sink with the table name, database name, and cluster name.
Run the Pipeline: Once you have configured the Pipeline, you can execute it to start ingesting data into Azure Data Explorer. Azure Data Factory provides a visual interface that allows you to monitor the progress of your Pipeline and troubleshoot any issues.
By integrating Azure Data Explorer with Azure Data Factory, we have easily ingested and processed data from various sources into Azure Data Explorer. This integration allows us to build scalable and flexible data integration pipelines that can handle a wide variety of data sources and destinations.
In this blog post let us stop for a second and see where we are in this whole create an Azure Data Explorer cluster and ingest data. High level summary below:
What is Azure Data Explorer:
It is a fast and scalable data analytics service that can be used to ingest, store, and analyze large volumes of data from various sources. Here are the steps to ingest data using Azure Data Explorer:
Create a database and a table: The first step is to create a database and a table in Azure Data Explorer where the data will be stored. You can create a database and a table using Azure Portal, Azure PowerShell, or Azure CLI.
Prepare the data for ingestion: Before ingesting the data into Azure Data Explorer, you need to prepare the data. This includes cleaning and formatting the data in a way that is compatible with Azure Data Explorer.
Choose a data ingestion method: Azure Data Explorer supports several data ingestion methods, including Azure Data Factory, Azure Stream Analytics, Event Hubs, and more. Choose the method that best suits your needs.
Ingest the data: Once you have chosen the data ingestion method, you can start ingesting the data into Azure Data Explorer. The data will be automatically indexed and stored in the table you created in step 1.
Verify the data ingestion: After the data is ingested, you should verify that it was successfully ingested and is available for analysis. You can use Kusto Query Language (KQL) to query the data and perform analytics.
In summary, to ingest data using Azure Data Explorer, we need to create a database and a table, prepare the data, choose a data ingestion method, ingest the data, and verify the data ingestion.
In the previous blog post we created a database in our Azure Data Explorer (ADX) cluster.
In this blog post we will discuss how we can ingest data into that database as part of this process:
There are several ways to ingest data – we will be using the cluster we have built – but I will cover a FREE method where you can use Azure Data Explorer and familiarise yourself with it – where you only need a Microsoft account or an Azure Active Directory user ID – no Azure subscription or credit card is needed. More on that later.
Data ingestion is the process used to load data records from one or more sources into a table in Azure Data Explorer. Once ingested, the data becomes available for query.
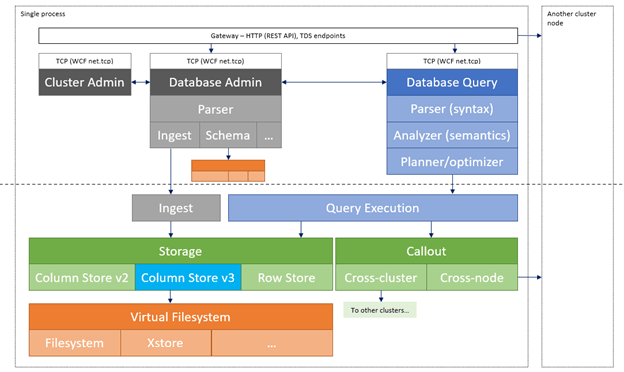
The diagram below shows the end-to-end flow for working in Azure Data Explorer and shows different ingestion methods:
The Azure Data Explorer data management service, which manages the data ingestion, implements the following process:
Azure Data Explorer pulls data from our declared external source and reads requests from a pending Azure queue.
Data is batched or streamed to the Data Manager.
Batch data flowing to the same database and table is optimised for fast and efficient ingestion.
Azure Data Explorer will validate initial data and will convert the format of that data if required.
Further data manipulation includes matching schema, organising, indexing, encoding and data compression.
Data is persisted in storage according to the set retention policy.
The Data Manager then commits the data ingest into the engine, where can now query it.
Supported data formats, properties, and permissions
Supported data formats: The data formats that Azure Data Explorer can understand and ingest natively (for example Parquet, JSON)
Ingestion properties: The properties that affect how the data will be ingested (for example, tagging, mapping, creation time).
Permissions: To ingest data, the process requires database ingestor level permissions. Other actions, such as query, may require database admin, database user, or table admin permissions.
We have 2 modes of ingestion:
BATCH INGESTION:
This is where we batch up our data and we optimise it for high throughput. Out of the two methods this one is the faster method and typical for what you will do for data ingestion.We set our ingestion properties for how our data is batched and then small batches of data are merged and optimised for fast query results.
By default, the maximum batching value is 5 minutes, 1000 items, or a total size of 1 GB. The data size limit for a batch ingestion command is 6 GB.
This is where our data ingestion is from a streaming source and is ongoing. This allows us near real-time latency for any small sets of data that we in our table(s). Data is initially ingested to row store and then moved to column store extents. You can also ingest streaming data using data pipelines or one of the Azure Data Explorer client libraries:
IoT Hub: A pipeline that is used for the transfer of data from supported IoT devices to Azure Data Explorer. For more information, see Ingest from IoT Hub.
Azure Data Factory (ADF): A fully managed data integration service for analytic workloads in Azure. Azure Data Factory connects with over 90 supported sources to provide efficient and resilient data transfer. ADF prepares, transforms, and enriches data to give insights that can be monitored in different kinds of ways. This service can be used as a one-time solution, on a periodic timeline, or triggered by specific events.
Apache Spark connector: An open-source project that can run on any Spark cluster. It implements data source and data sink for moving data across Azure Data Explorer and Spark clusters. You can build fast and scalable applications targeting data-driven scenarios. See Azure Data Explorer Connector for Apache Spark.
Using SDKs to programmatically ingest data:
We have a number of SDKs that we can use for both query and data ingestion.
You can check out these SDK and open source projects: