Creating an App Service in Azure that connects to an Azure SQL Database.

Using the methodology listed in my previous blog post on creating an Azure SQL Database we now have a Continuous Integration database (named  CIAzureWebAppDEMO_DB).

Now that we have a database its now time to create the web app. This will be an App Service in the Azure portal.

For more background information have a look at Microsoft’s documents on this area:

https://docs.microsoft.com/en-us/azure/app-service-web/app-service-web-app-azure-resource-manager-powershell
  1. We’ll create a App service plan first (mainly as my old name was … old):
App_Service_reason
This App Service Plan has a historical and nonsensical name so has to go…

So using PowerShell:

$resourcegroupname = “AzureDEMO_RG”
$location = “Australia East”
$AppServicePlanName = “AzureDEMO_AppServicePlan”

New-AzureRmAppServicePlan

-Name $AppServicePlanName

-Location $location

-ResourceGroupName $resourcegroupname

-Tier Free

Next we’ll create our App Service:

$resourcegroupname = “AzureDEMO_RG”
$location = “Australia East”
$AppServiceName = “CIAzureWebAppDEMO”
$AppServicePlanName = “AzureDEMO_AppServicePlan”

New-AzureRmWebApp

-Name $AppServiceName

-AppServicePlan $AppServicePlanName

-ResourceGroupName $resourcegroupname

-Location $location `

We can now configure the app service application settings using PowerShell or through the portal and as all Azure Web Apps need configuration values, database based applications also need to have their database Connection String values configured.

Therefore because this app service connects to an Azure SQL database we need to assign it a connection string.

Portal

You can use the Azure portal to configure your newly created App Server:

Configure_AppService_DB_Cxn

  1. Open the Azure Management Portal via https://portal.azure.com
  2. Navigate to the Web App within the portal.
  3. Under “All settings” open up the “Application settings” pane
  4. Scroll down to the “Connection strings” section
  5. Configure as necessary.

PowerShell:

I prefer to use PowerShell as I can feed this into my Continuous Delivery pipeline as I build applications/databases on the fly.

For security reasons we will hash the connection string:

$resourcegroupname = “AzureDEMO_RG”
$location = “Australia East”
$AppServiceName = “CIAzureWebAppDEMO”
$AppServicePlanName = “AzureDEMO_AppServicePlan”

# Create Hash variable for Connection Strings
$hash = @{}

# Add a Connection String to the Hash by using a Hash for the Connection String details
$hash[“defaultConnection”] = @{ Type = “SqlAzure”; Value = “Data Source=tcp:webdbsrv69.database.windows.net,1433;Initial Catalog=CIAzureWebAppDEMO_DB;User Id=CIAzureWebAppDEMO@webdbsrv69.database.windows.net;Password=<redacted>;” }
# Save Connection String to Azure Web App
Set-AzureRmWebApp -ResourceGroupName $resourcegroupname -Name $AppServiceName -ConnectionStrings $hash

So there we have it – an App Service created in a specific App Service Plan that can now connect to an Azure SQL Database. Using this methodology I could have configured anything/everything in the application settings.

Now let’s get rid of that badly named App Service Plan in my next post.

Yip.

Removing an Azure SQL Database using PowerShell..

In this post we will remove some databases located in Azure.

This related to my last post where I am cleaning up some badly named databases and replacing them with standardised database names.

So we have this situation:

database_create_1

We want to get rid of the top two databases AzureWebAppFunctionalTestDB and AzureWebAppQADB.

So we’ll check we’re logged in:

PS > Get-AzureAccount

If not – then just login

PS > Login-AzureRmAccount

It is always a good idea to list the databases on your server:

PS >Get-AzureSqlDatabase -ServerName $servername

And now we’ll simply remove the database:

# Some variables for our resources
$resourcegroupname = “AzureDEMO_RG”
$databasename1 = “QAAzureWebAppDEMO_DB”
$databasename2 = “FTAzureWebAppDEMO_DB”

Remove-AzureSqlDatabase -ServerName $servername -DatabaseName $databasename1

Remove-AzureSqlDatabase -ServerName $servername -DatabaseName $databasename2

You will then be asked if you really want o remove the database:

database_remove

Answer appropriately and viola – we have removed our Azure SQL Databases via PowerShell


Yip.

Creating an Azure SQL Database via PowerShell

This post is about using the brilliance of PowerShell to script the creation of databases in Azure.

Background:

Apart from the obvious question of why not? The actual reason is one of standards and how I did not adhere to my own standards that I’ve been preaching for the past 17 years.

For background read my post on standards:

The 20 second rule (or why standards matter).

And you will see how badly I strayed…

Exhibit A:

The WHY of this presentation 3

Yes… my application name and database name do not match my standard of “everything should be able to be tracked from web to database via a name

So of course being a guy who does Data Platform stuff – we’ll create the database first, then the app service then we’ll adjust our release in VSTS. These of course will be split over 2 or more blog posts.

Quick discussion on Tiers in Azure:

There are quite a few different pricing tiers available with Azure for a Microsoft Azure SQL Database.

It allows us to select the capacity metrics that are relevant for our application, without paying too much than what we actually need. Switching between tier plans is very easy. If you have short periods of high performance demand, we can scale up our Azure SQL database to meet those demands. Later on, after the demand diminishes, we can scale the SQL database back down to a lower pricing tier, thus savings us costs.

For this database I’m going to use the Basic tier.

PowerShell Scripts:

So in powershell we’ll log into our Azure subscription:

PS > Login-AzureRmAccount

Which will ask us to login.

We then see our subscription details:

Environment : AzureCloud
Account : moosh69
TenantId : [some hexadecimal numbbers here]
SubscriptionId : [some more hexadecimal numbbers here]
SubscriptionName : [Name of your subscription]
CurrentStorageAccount :

OK, for fun let’s see what databases we have using PowerShell.

Firstly we’ll find out our database server:

PS > Get-AzureSqlDatabaseServer

Which will list our database server and we’ll create a variable $servername using the output of the above.

We now run this command to list the databases in that server:

Get-AzureSqlDatabase -ServerName $servername

Name : AzureWebAppQADB
CollationName : SQL_Latin1_General_CP1_CI_AS
Edition : Free
MaxSizeGB : 0
MaxSizeBytes : 33554432
ServiceObjectiveName : Free
ServiceObjectiveAssignmentStateDescription :
CreationDate : 07/01/2017 8:18:54 AM
RecoveryPeriodStartDate : 27/04/2017 8:29:07 PM

Name : AzureWebAppFunctionalTestDB
CollationName : SQL_Latin1_General_CP1_CI_AS
Edition : Basic
MaxSizeGB : 2
MaxSizeBytes : 2147483648
ServiceObjectiveName : Basic
ServiceObjectiveAssignmentStateDescription :
CreationDate : 08/01/2017 5:57:42 PM
RecoveryPeriodStartDate : 26/04/2017 8:07:56 PM

Name : master
CollationName : SQL_Latin1_General_CP1_CI_AS
Edition : System
MaxSizeGB : 30
MaxSizeBytes : 32212254720
ServiceObjectiveName : System0
ServiceObjectiveAssignmentStateDescription :
CreationDate : 02/01/2017 10:09:58 PM
RecoveryPeriodStartDate :

We’re not too interested in the MASTER database.

So we’re going to create 2 new databases (and eventually point our app services at them).

Here is the very simple code:

# Some variables for our resources
$resourcegroupname = “AzureDEMO_RG”
$databasename1 = “QAAzureWebAppDEMO_DB”
$databasename2 = “FTAzureWebAppDEMO_DB”

New-AzureRmSqlDatabase -ResourceGroupName $resourcegroupname `
-ServerName $servername `
-DatabaseName $databasename1 `
-Edition “Basic”

New-AzureRmSqlDatabase -ResourceGroupName $resourcegroupname `
-ServerName $servername `
-DatabaseName $databasename2 `
-Edition “Basic”

And just like that we’ve created our first database in Azure using Powershell in about 5 seconds.

Yip.

Moving Azure resources between subscriptions – especially VSTS Team Services Account

For the past 6 months I’ve been paying for my own Azure subscription. My work has a plan but for some reason I (and others) who had a MSDN Subscription (Infrastructure) could not access the ‘free’ credits. I use Visual Studio Team Services (VSTS)  in a lot of my DEMOs and thus was paying quite a bit of my own money to design/create/test my DEMOs before presenting them (which also was costing me run time $$).

Until today.

I finally got added to my work’s “Pay-As-You-Go” subscription. Which meant I had to transfer ALL my Azure resources. And I mean ALL MY AZURE resources.

So I decided to use the portal and it really was as simple as going into my Resource Groups and clicking change subscription.

CHanging Resource Groups
Then choosing the new subscription, creating a new resource group to move all the resources to and clicking that you understand that tools and scripts need to be updated.

CHanging Resource Groups_2

It took about 3 minutes and was very painless.

At this point I’d like to state I could have probably used PowerShell but I wanted to actually see if the portal would do what I needed.

It did.

Except that when I ran up my DEMOs in VSTS — it couldn’t see any of my app services. Which wasn’t surprising as I had actually clicked “I understand that tools and scripts associated with moved resources will not work until I update them to use new resources IDs”.

Duh…

So I then spent most of the afternoon trying to move my VSTS Team Services resource. I got a heap of move failures.

Then I read:

https://social.msdn.microsoft.com/Forums/vstudio/en-US/7404fed9-f9cd-4d11-acae-a7726d7dbb15/move-visual-studio-team-services-to-another-subscription?forum=TFService

Which lead me to:

https://blog.kloud.com.au/2014/01/06/how-to-link-existing-visual-studio-online-with-windows-azure/

I then used https://manage.windowsazure.comto unlink my VSTS subscription from my old ‘Pay-As-You-Go’ subscription and then link it to the new one.

CHanging Resource Groups_3

All that was needed now was to check in the Azure Portal that VSTS was on the new subscription (it was) and then to edit the Service End Point for each project that might use them in VSTS:

CHanging Resource Groups_4

What this now means is I can now start creating a heap of Azure resources ( mostly Data Platform stuff because… Data Platform).

So my next post is going to be about creating a heap of Azure resources.

Yip.

Installing a Visual Studio Team Services private build agent hosted On-Premises

This blog post is about a situation where I  use Visual Studio Team Services (VSTS) to build/deploy my DEMOs. Those DEMOs are what I use to illustrate Continuous Integration & Continuous Delivery (important parts of that thing called DevOPs).

I use my own personal VSTS account so that I am not showing anything commercially sensitive.

One thing with using a basic account is that you only get 240 build minutes per month. These builds are utilising the hosted build agents in Azure.

This works great – up until I have 4 DEMOs that are different and require testing before I present them. In May 2017 I had 4 DEMOs to conduct:

Code Camp Christchurch on May 13th  where I was speaking twice: (VSTS and Azure DEMO and SQL Server Data Tools DEMO) both of which would be using VSTS.

A webinar for the DBA Virtual Chapter on May 18th which was on “DevOPs and the DBA”.

SQL Saturday Brisbane on May 27th – mostly the same DEMO as the DBA VC.

Whilst the DEMOs themselves would only use 12 minutes of build time – the preparation of them would push me over the limit. I also wanted to try quite a few new things related to SSDT, DACPACs and other things related to SQL Azure.

However…..

You can use your own hosted (known as ‘private ‘) build agent and connect to up to VSTS – so long as it has access and the right tools installed on it….

That is another reason to use your own hosted agent — you may have specific software required for your build(s). In my case I would be doing a lot of builds relating only to SQL Server, Azure SQL Database and associated tools.

Oh yeah — VSTS allows one free private hosted agent.

Hooray!!

So I have created a dedicated build agent just for my SQL Server activities.

Here is a step by step guide to installing a private hosted build agent. For authentication I will be using a Personal Access Token (PAT) for the agent to authenticate to VSTS.

  1. Log into VSTS and from your home page, open your profile. Go to your security details.VSTS_Agent_0
  2. Configure the PAT — for the scope select Agent Pools (read, manage) and make sure all the other boxes are clearedVSTS_Agent_0_1
  3. Save the token somewhere as you will need it when installing/configuring the agent on the on-premises server.
  4. Log on to the machine using the account for which you have permissions to install software and also access VSTS
  5. In your web browser, sign on to VSTS, and navigate to the Agent pools tab: https://{your_account}.visualstudio.com/_admin/_AgentPool

    VSTS_Agent

  6. Click Download agent.
  7. On the Get agent dialog box, click Windows.
  8. Click the Download button.
  9. On the server – extract the ZIP file in a directory and run config.cmdVSTS_Agent_3
  10. Fill in details as required – you will use the PAT token from step 2/3 above:VSTS_Agent_4
  11. Go back into VSTS and you will now have a new hosted agent:VSTS_Agent_5
  12. For the particular project — go into Settings | Agent Queues and choose the existing pool that will have the newly installed private agent in it.VSTS_Agent_6
  13. Next we want to associate our build steps with this queue – so edit your build definition and choose the Agent Queue from above:VSTS_Agent_7
  14. Now the REAL fun begins – let’s queue a build!!:
    VSTS_Agent_8
  15. And of course it works the first time….VSTS_Agent_9
  16. If  we now look in generated artifact we will have our desired result – a DACPAC fileVSTS_Agent_10


That we can now use VSTS to deploy out to our Azure SQL Database (and also on-premises SQL Server).

Which is the basis for another blog post…..

Yip.

Retrospective analysis of SQL Saturday South Island (#sqlsat614)

Now that SQL Saturday South Island (also known as #sqlsat614 on the Twitter) is done I thought it would be good to look back at an event that consumed me for 4 months.

If you haven’t already — read my post on how to grow a technical conference.

Back in October 2016 just before the PASS Summit Martin Catherall (t | b) and I agreed on a date that we’d run SQL Saturday South Island (SSSI). I would be the lead organiser and Martin would be on the organising committee – along with Rob Douglas (t | b).

Mention should also go to Nick Draper (t) and Sarah Harding (t) — who are on my User Group Committee who helped out with volunteering (and sponsorship (The Talent Hive)).

I was the only of this triumvirate who actually lived in Christchurch so it made sense that I’d do most of the setup work here. From January 2017 until April 2017 I would Skype Martin nearly every week (sometimes more than once) to discuss things relating to SSSI. I’ll give Martin kudos in that he put up with my nagging and OCD like ways very amicably and I want to acknowledge that without him being the calm listening ear to my hypotheses/rants then SSSI wouldn’t be the success it was.

The timezone difference meant that most Skype calls were at 9pm NZT and later and this did result in some humorous (awkward?) situations based on my nighttime attire that Martin no doubt got therapy for….

Summary of SQL Saturday South Island:

A.  We had 126 onsite attendees (up from 93 in 2016). Our venue limit was 150 people.

B.  We had 20 speakers in 5 streams across 4 tracks

Of those speakers:

1 from Singapore

2 from Brisbane, Australia

2 from Sydney, Australia

2 from Melbourne, Australia

1 from Adelaide, Australia

3 from Auckland, NZ

3 from Wellington, NZ

2 from Nelson, NZ

4 from Christchurch, NZ

Of those 20 speakers the were made up of 11 Microsoft MVPs and two Microsoft Certified Masters.

To put this in perspective the most we’d ever had before was 15 speakers (2016) and we had 50% Christchurch based speakers. I really wanted to have speakers from outside Christchurch so that attendees could see people they normally wouldn’t.

Thank you to our sponsors:

Without the generosity of our sponsors we wouldn’t be able to put this event on.

Jade Software

Microsoft

WardyIT (the first SQL Saturday outside of Australia that WardyIT have sponsored)

SQL Services Limited

SentryOne

Dave Dustin Consulting & Training

PASS

The Talent Hive

Ara Institute of Canterbury

Special mention should be made about Dave Dustin Consulting & Training — Dave (t |w) has been a long time supporter of SQL Saturdays in Christchurch. This year Dave was not only a speaker but signed up as a sponsor. This was very humbling for me – as that sponsorship meant we could do some more things — but more importantly was a higher % of Dave’s earnings/year than (say) Microsoft earnings/year…..

It meant a lot to me that we had someone who believed so much in what we were doing that they’d put their own money behind us. Thanks Dave – I hope you get some good consultancy gigs out of what you did for us.

OK, here is a summary of:

Things we did right:

Getting “remote” speakers:

Promoting Christchurch as a cool close knit community to speakers — every SQL Saturday or conference I went to in Australasia I talked about how friendly we are. It worked!!

Getting sponsors:

Approaching sponsors we didn’t think would sponsor us — they did!!

Getting great volunteers:

Asking for more volunteers than last year – we even had t-shirts for them!!

Promoting the conference:

Promoting across all forms of social media – this greatly helped our registrations.

Awesome Precons:

Having both Reza Rad and Warwick Rudd do precons for us greatly helped – thanks guys.

Things we could have done better:

Adjacent Rooms:

Our four rooms were split across the campus for the first time – one in N Block and the other 3 in W block.

Ara_W_block

Which made the DBA track in N Block somewhat disjointed. Thing is there was a spare room next to the other three so in 2018 we’ll have the four tracks all together.

Have a local 2IC:

Whilst Martin Catherall and I work together nicely– he is based in Melbourne. So I need someone local that I can nag as much as I nagged him 😉

Scanning:

Have more people than myself scanning speedpass tickets. In 2018 I’ll just have a scanning BBQ as well as a speaker BBQ on the Sunday.

More International Speakers:

I want some North American speakers. Because if the great precons we ran we have some $$ in the bank for SSSI 2018. So I am going to offer speakers the chance to hang out afterwards in Hanmer Springs for 2 nights on SSSI.

I’ll even take speakers diving in Akaroa or Kaikoura as part of “Come to Christchurch and experience Kiwi hospitality”.

If you want to know what Kiwi Hospitality is like  — read this post by my SQL bro Nagaraj Venkatesan (t | b):

http://www.sqlservercentral.com/blogs/sql-and-sql-only/2017/04/13/sql-saturday-christchurch-2017/

Summary:

We grew our registrations up to 158 this year from 123 last year, we had 126 people onsite this year compared to 93 last year.

In short – I can’t wait until SQL Saturday South Island 2018.

I’ve already started planning (and Skype calls with poor Martin Catherall) and my aim is to get some North American speakers out here.

Yip.

Resolution to “Connection Timeout Expired. [Pre-Login] initialization =18090; handshake=14281” error

This blog post is about a SQL Server connection issue that presents itself:

AG_handshake error

We were building an Availability Group (AG) at the time for an online banking platform.

PROD would have 4 nodes – 2 in Christchurch and 2 in Auckland. Whilst building the prePROD installation (a 3 node cluster (2 in Christchurch and 1 in Auckland) we ran into an interesting issue as described in the title.

During the build phase of setting up the AG you have to add in the replicas – and this brings up the normal connect window in SSMS.

Except for some reason Node 1 could not connect to Node 2.

Yet Node 2 could connect to Node 1.

What the?

Things got down right weird when I decided to try connecting with SQL Authentication and Node 1 COULD connect to Node 2.

But using windows authentication to connect – Node 1 could NOT connect to Node 2.

A brief description of the environment – which for this setup is one of the most secure/restrictive I’ve ever installed SQL Server in.

Each Node has a base IP address – but it also had a secondary IP address that SQL Server would listen on and the environment required non-standard ports for SQL Server to listen on.

Node 1 – 172.34.59.106 and a secondary address of  172.34.59.108

Node 2 – 172.34.59.107 and a secondary address of 172.34.59.109

The clustered IP address in Christchurch was going to be 172.34.59.110.

The non-standard port for connecting was 51234.

Just to add some complication the client had already started testing the application using Node 1 – using 172.34.59.108 which had a DNS entry associated with it that the application would connect to.

We had tried to connect to the instance on Node 2 from Node 1 using a client alias setup for the instance name (using the IP address and port ) and we also had tried using IP Address,port:

172.34.59.109,51234

We could connect to it on Node 2 itself, we could telnet to it from Node 1 but we could not connect to it IF we were using windows authentication.

As mentioned SQL Authentication worked just fine.

What the…..????

After about an hour trying every permutation we stumbled upon the eventual answer which was found by logging onto the DNS server and lo and behold Node 2 did not have a DNS entry associated with its secondary address – 172.34.59.109.

Because of the restrictive nature of this install it was not my team setting up DNS – which we normally do – or our networking department who do the big stuff.

So we added in forward and reverse DNS records and voila – things worked.

This was a very confusing error – as it only occurred if we were using windows authentication – which we needed to do for the AG.

I could not find much on the internet about the error number but after the fact I found a forum post that I have since responded to – the answers there were close but I think my answer is closer – well for my situation anyway…

This error just goes to show how important it is to go through all the variables associated with a problem, investigate everything and also make sure that things are setup how you expect – don’t assume they are.

Yip.

Can I tune the tempDB of an Azure based SQL Server database…

Yip. You can.

I was originally going to write this post about tuning tempDB in our Azure SQL database. Which would be a very short post.

You can’t.

So I’ll write about tuning tempDB in your Azure based SQL Server database.

Why tempDB tuning? Well I consider it a valuable tool in our tuning toolbelt – in fact I’ve presented about it a couple of times at SQL Saturdays:

Sydney

Brisbane

As well as at my own User Group

So our SQL Server instance will be hosted on Azure Infrastructure as a Service (IaaS) utilising an Azure Virtual Machine. So in fact – most of the same database tuning methods and options will be applicable to SQL Server hosted here as you would for on-premises installations.

Firstly – you need to read this document which is extremely helpful in designing what your VMs and storage will look like:

https://docs.microsoft.com/en-us/azure/virtual-machines/windows/sql/virtual-machines-windows-portal-sql-server-provision

Same as with on-premises we are going to size our tempDB database file(s) appropriately – I like to presize mine and I typically will put one database file per CPU. Autogrowth is set to 100MB – but I typically will have done performance testing using the databases that will be hosted here to know what size tempDB files to put down.

A very important setting that will make a difference especially if you have restore a database or have to autogrow your files is:

Instance File Initialization (IFI)

This reduces the I/O required to create files and extend files, it is not enabled by default in Azure VM images.  You need to add your SQL Server service account to Perform Volume Maintenance Tasks security policy.

Some recommendations for IFI:

  • Configure IFI before creating database
  • Configure IFI first and then create & extend files for tempDB.
  • Configure IFI first before restoring any database on the new VM
  • Restart SQL Server service for the configuration manager after configuring IFI

The performance testing you will undertake for tempDB will utilise analysis of latch contention and rather than re-write something I’d prefer you went to the source:

https://www.sqlskills.com/blogs/paul/the-accidental-dba-day-27-of-30-troubleshooting-tempdb-contention/

http://www.sqlservercentral.com/blogs/robert_davis/2010/03/05/Breaking-Down-TempDB-Contention/

https://www.brentozar.com/archive/2014/05/tell-need-tempdb-files/

http://michaeljswart.com/2015/08/whats_going_on_inside_tempdb/

The articles above are really invaluable to help us analyse tempDB in our on-premises SQL Server installations – but they are just as applicable if you are running your SQL Server instance on a VM hosted in Azure.

So don’t let running in Azure fool you into everything will be OK – as you still need to tune tempDB (and other SQL Server metrics) but also – know that running in Azure there are a lot of things that you’ll get there (SSDs, scale, …) that you won’t get in on-premises.

By all means use IaaS for your SQL Server instance running on a Azure Vm – there are cases where you can’t just use Azure SQL. When you do you’ll find that performance might even be better than your on-premises SQL Server…

Yip.

How to grow the exposure of a Data Platform based conference (SQL Saturday South Island)

SQL Saturday conferences are awesome.

That is the opening line of this blog post – because it’s true and understated.

If you’re reading this and do not know what a SQL Saturday is – go visit http://www.sqlsaturday.com/ and find your nearest SQL Saturday. I’ve been lucky enough to have gone to a few as an attendee and now I go as a speaker around Australasia and Portland, Oregon.

The tl;dr of this can be found in the summary section – it’s a summary of how I found some ways to grow the attendance of my SQL Saturday.

Anyways, if you’re keen to read on:

My experience with SQL Saturday in Christchurch, NZ has been:

2013 Attendee

2014 Attendee, volunteer

2015 Attendee, volunteer, committee member

2016 Attendee, volunteer, speaker, co-organiser

2017 Attendee, volunteer, speaker, lead organiser

Martin Catherall (t | b ) had done a fantastic job of introducing SQL Saturday to Christchurch and in 2016 we worked together to make SQL Saturday Christchurch to become SQL Saturday South Island. Why South Island – well the fact is that New Zealand is small. Beautiful and awesome, but still small. Christchurch only has 366,000 people and all of the South Island — 1,096,200 people.

To grow our attendance numbers we had to include our ‘sister’ cities.

Thus SQL Saturday South Island was born in 2016 – this was also the FIRST year we hadn’t piggy backed off the local Code Camp Conference (which I am part of an awesome triumvirate with Steve Knutson (t | b)  & David Carter (t | w) ).

We had 123 attendees in 2016. This was honestly 22 more people than what I said to Martin that we had to achieve.

Fast forward (or rather catch up) to 2017. Martin very graciously let me take the lead on SQL Saturday South Island 2017 (#614) — mostly because he now lives in Melbourne, Australia — he moved there in October 2015.

My aim was 150 registrations. Which I thought was a ridiculous (for many reasons I never said this to Martin) number. The 123 registrations in 2016 was mostly because we were extremely lucky to have John Martin (t | b) from SentryOne come over. A speaker from the UK of John’s calibre will bring in a good crowd – and did.

For SQL Saturday you need a couple of things:

Venue

Speakers

Sponsors

Attendees

In my opinion that list is from easiest to hardest.

The venue is fairly easy because at worst – you pay for a venue. There’s always a venue…

I am now a speaker on the SQL Saturday ‘circuit’, so I know that I can promote how good Christchurch is to entice International speakers – and I did. I managed to get my SQL bro Nagaraj Venkatesan (t ) from Singapore to come over – I offered a room in my house to help him save costs. This guy is one of the most nicest guys we have in the speaker community – which is why I consider him a ‘bro’ (kiwi speak for brother).

Sponsors – a little trickier as there is only a finite amount of money to go around and NZ’s population size is 4.5 million. Only slightly larger than Sydney or Melbourne Australia. As mentioned Christchurch is tiny compared to the bigger cities that do SQL Saturday in Australasia. So far I’ve never had a sponsor say no that we’ve approached and we’ve also been lucky to have some approach us. I love numbers so I always talk about how our SQL Saturday has grown over the years – as well as the SQL Server User Group I run that grew from 20 users in 2013 to 458 in 2017. Why mention the User Group? — well it’s going to feed the SQL Saturday with people.

Sponsors love people.

I’m lucky/blessed/fortunate that Jade Software – the company that employs me has been generous to us over the years and has supported us greatly.

(Thank you Caroline Francis our Director of Marketing for always reading my emails that contain lots of numbers and heaps of enthusiasm…

… and agreeing to help us out with X, Y and Z)

Which after this long intro – leads me to the point of this blog – how to get more attendees along to SQL Saturday or any Data Platform conference.

Marketing the conference requires getting the information out to the masses.

Because I was locally based I took this as my responsibility.

I offered to speak at as many local User Groups that were applicable (I really can’t write/do java so had to scrub that UG off my list).

After each presentation I had a slide or the website that I quickly talked about SQL Saturday South Island. When I took over the SQL Server User Group in October 2015 one thing I decided to bring to it was collaborative community — I invited all the User group leaders and their respective groups to Christmas Drinks – and started the idea of cross-talks. I’d speak at the .NET UG about data – the .NET speakers could speak at my UG about accessing data. I even had the Agile Group join my group for a session from RayGun.

(If you haven’t looked at RayGun and you do any form of development – you need to)

So this collaborative community meant that instead of just my own User Group attendees I now had a far greater reach. I emailed a lot of User Group leaders and asked them to email their groups about SQL Saturday (I wrote the text that they could just copy|paste – vitally important that you make it easy…!!).

I lecture at a local university – 3 times a year – however my first lecture was in May.

So I drove in one Monday morning in my own time and spoke to the class – I had the slides promoting topics (Machine Learning, Cognitive Analysis, SQL injections)  and website and got my SQL Saturday registration site listed on their internal intranet.

We run tech events in Christchurch – I went to a number of applicable ones, because I’ve spoken at a few – I approached the people in charge of mail outs and gave them information that they could put out to their mailing lists here in Christchurch (again make it simple for them – copy|paste for them takes 5 seconds!!).

I asked my mates on the Twitter to retweet anything I put up about #sqlsat614 I even asked people who use Facebook to promote us. I don’t use Facebook like normal people so my reach there was very limited.

A special mention goes to Nick Draper (t ) – one of my User Group committee members and who has been co-running it since it began officially in March 2013. Nick used his own network of people within Microsoft and the Christchurch IT community to help promote the event. It is people like Nick and everyone I mention in this post who make a HUGE difference and make my job so much easier.

I used LinkedIn as a method of getting the message of a FREE conference that will help you learn as a way of getting interest. I used my own network to like/comment/share/write their own pieces. I made sure the words “free education event” were included. Where people wrote on LinkedIn I purposely did NOT give them text to write – this was a personal writing and if they chose to support me then I’d rather it were their words. Plus I take 2,183 words whereas others take 200 words to get a message across…

Because I co-run Code Camp as well – it meant I had (limited) access to email addresses. So I signed up with mail chimp and sent a nice email to 284 people who had attended in the past 4 years (I only sent one email out as I felt quite ‘spammy‘ doing it – even though it was for a good cause).

I also TIMED all of the above events so that we started small with one thing, then hit the population with another social media interaction. I did not want to over saturate and anger my audience with spam. By drip feeding over 6 weeks I watched the numbers rise:

Screen Shot 2017-04-01 at 15.24.45

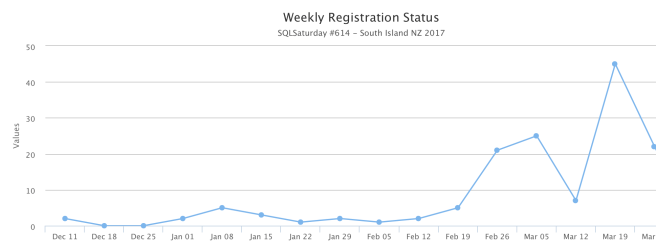
I had done some initial “coming soon” announcements in early January which is why there were some initial registrations then.

Timing is vitally important here – announce too soon and people forget – announce too late and people have plans. It is on a Saturday after all.

Saturday’s are important to our industry – it is the day where we can (hopefully) relax, associate with friends, spend time with family.

I’ve found getting the message out there about 3 months out – just a ‘hey we’re gonna be on this date more news soon’ type of announcement works well. 6-8 weeks out and you’ve got your speakers lined up, you’ve got a venue and you know if you can supply a free lunch and/or something afterwards. Sponsors are truly valuable for allowing us to exist and do things.

I don’t want SQL Saturday South Island to be all flashy, with heaps of shiny things – that isn’t the New Zealand way for one thing and my budget is just right that I know I can put this on at a big enough venue, that people will learn something and there’ll be a free lunch and the possibility of a free beer and pizza afterwards.

Oh yeah – let’s quickly talk about something that is a game changer:

Volunteers

I’ve been one, I still am one and without them — we’d be a mess.

Last year when I took over as co-organiser I let my inner Operations Manager take over and made volunteers an official part of SQL Saturday South Island. Beforehand it’d been mostly informal and it mostly worked.

By making it official in 2016, (2017 is the first year we’ve used the SQL Saturday volunteer portal and I really wish we had earlier) it meant that I knew how many people would help us on the registration table, how many people would help clean up afterwards. Which allowed me to plan and also know how many small thank you gifts I would buy to say a huge thank you to the unsung heroes of SQL Saturday South Island.

Summary

In short these are the things that helped grow SQL Saturday South Island:

  1. Growing a community locally amongst User Group leaders – SQL Saturdays (or at least mine) are a combination of DEV, DBA, OPs people. This means that the structure of my SQL Saturday will appeal to
    1. .NET developers
    2. DBAs
    3. Data Scientists
    4. Operations folk who spin up resources.Collaboration goes both ways –  I spoke at a lot of local UGs and invited the leaders of them to send speakers my way.
  2. Local Universities – if you aren’t already – reach out to local universities to:
    1. teach students about the real world – even just for an hour
    2. invite said students to come along and learn from the masters of our industry
  3. Local Tech Events – same thing – go along, speak, support them because:
    1. you’ve now extended your User Group reach to 100s more professionals
    2. you’ll network with a few more professionals and learn from them
    3. they’ll assist you in communicating to their members about SQL Saturday
  4. Twitter – #sqlpass , #sqlsaturday , #sqlsat , #sqlfamily means:
    1. you’ll get exposure of your event for speakers/sponsors/attendees
    2. others who care (and there are a lot who do) will retweet to their networks
    3. it gives you a chance to work on your own brand (that’s another post….)
  5. LinkedIn – be careful – this is a professional network and you want to make sure that you’re not over-saturating your network with spam. This was the one area where I let people write their own words. In other areas I provided text to make it easy for people.
  6. MailChimp – as above – you need to be wary of just spamming your intended audience. I had 62% click rate on my mail out (notice I didn’t write mail outs there). This was primarily an announcement – I timed it for 6 weeks out and left it at that.
  7. Friends in the industry – one of my User Group committee members works in recruitment.  I provided some text and she re-wrote (shortened) it and sent it out to her own mail list. My other industry friends reached out to their contacts i.e. Microsoft to publicise our event via (say) MSDN mail outs.
    Even people as far away as Brisbane can help via Social Media like a historical supporter of SQL Saturday South Island  – Warwick Rudd (t | b |w)
  8. That time at a BBQ….. I was at a mates BBQ and (randomly) starting talking about Power BI, a person there actually worked in IT and was interested in learning from Reza Rad (t | b) (he knew of RR but didn’t know of the upcoming SQL Saturday!!). He registered the next day and event registered for Reza’s precon. Basically talk a lot about your event – because your event is AWESOME.

This blog is about growing numbers – we are now at our venue limit of 150 people. My ridiculous number actually came about.

[Update 25th April 2017: Read my post about how well it actually went here]

Vitally important – our number of volunteers grew from 2 of us back in the 2014 to 12 people in 2017.

So SQL Saturday South Island is next weekend on 8th April, I’m really looking forward to it – to see some of my fellow speakers, to learn some things and more importantly to help all the people I’ve been communicating about it over the past 2 months:

connect, share and learn

Yip.