Simply download and install on your server – or a machine that has visibility to what you want to connect to.
When building new servers the most important thing after restoring and securing the database is syncing up the users. This is especially important for Availability Groups as SQL Authenticated users required the SIDS to be the same.
In the past I had some very long winded code that would do the sync – it was a mixture of TSQL and PowerShell. It worked but you know – it was cumbersome.
So I effectively practiced what I preached recently and used the Copy-DbaLogin command – actually I looked at what it did first by running:
Get-Help Copy-DbaLogin -Detailed
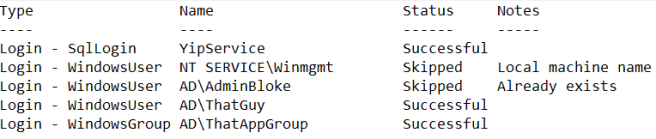
For what I needed to do – I needed both the SQL Authenticated users AND all Windows users/groups – so I just ran this:
This blog post is about how to change the default work folder _work that TFS agents use when building a solution.
Background:
I’m now a consultant – which is awesome – it means I get to visit clients and make a difference for them.
One particular client had installed TFS and their remote build agent was installed in C:\TFSAgent.
Methodology:
By default when installing TFS Agent you can choose the default for the work folder _work and normally this goes under the root directory of where you install the agent. So in this example they had the agent work folder at:
C:\TFSAgent\_work
Which was fine – until the builds were kicking off regularly (thanks to good Continuous Integration practices they were doing builds almost hourly) and C:\ started running out of space.
So a D:\ was added to the server.
but how to change the work folder to D:\TFSAgent\_work
A lot of posts on the internet are saying just remove the old agent and install it again. That to me seems a bit drastic.
This blog post is about how to diagnose what your Azure VM is doing while it is booting.
I have a DEMO VM that is hosted in Azure – it is where I have Visual Studio, Redgate tools as well as all my DEMO systems, presentations hosted for when I speak. That way when I go to a venue to speaker I only need (at worst) internet connectivity – and I have a phone with fantastic internet if the venue doesn’t.
What I do is keep the VM up to date in terms of windows patches and I make a point of 2 days out before an event of making sure all outstanding patches are installed.
Hint: this might tell you where this post is headed.
So 2 days out from speaking in Spokane – DevOPs & the DBA I made sure to start up my VM to check things were good. The only complicating factor was this was a day before I was to give a session to TheDevOpsLab so I thought – best to get this out of the way and practice my database unit test session that was going to be recorded.
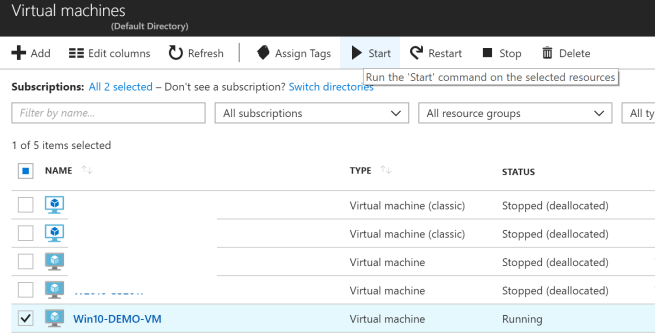
So I went into the Azure Portal and down to Virtual Machines and clicked “start”:
Let’s start up the VM and get started
Normally this start up process would take about 3-5 minutes whilst things started up.
However after 10 minutes I still could not connect. After 15 minutes I started to become worried. So I clicked on the Virtual Machine in the Azure Portal to see what usage was happening.
Things were happening alright:
The keen eye will note that is 2 hours worth of activity…..
Yip – my VM was busy doing heaps of stuff for 2 hours and the whole time I could NOT log onto it via RDP. Which is when I discovered “Boot Diagnostics” in the Azure Portal for Virtual Machines. It allows us to see the console of the VM.
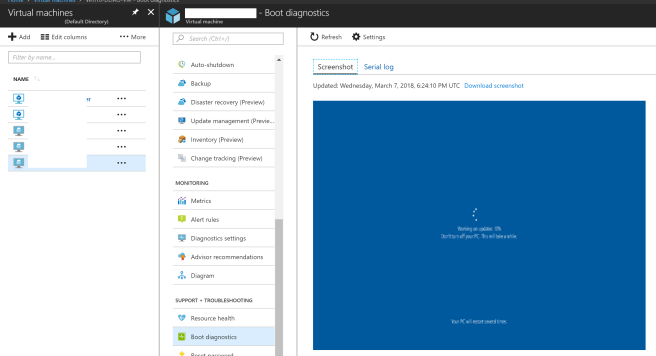
Simply click on your VM and choose “Boot Diagnostics”:
Let’s see what the VM is doing
Which gave me an insight to what my VM was spending so much time doing:
Ugh… Windows Updates.
So I waited for 2 hours whilst my VM applied these patches (to be fair it was a very big update).
The good thing was I could monitor the progress via Boot Diagnostics.
BTW – in normal running this is the console of my VM:
You should consider visiting New Zealand
Which is the view out my front gate. If you have never considered coming to New Zealand – hopefully the console of my VM hosted in Azure will help you decide.
Or consider submitting to SQL Saturday South Island:
We’re still open until 26th April 2018 (I extended it today) and to be honest if it’s past that date and you are International speaker – hit me up on twitter — @theHybridDBA if you want to speak – we’re relaxed as in New Zealand and love people who like to give their time to the community.
and I got a prompt for my username/password but when I entered both I got an error. O knew my username and password OK and I knew 2FA was working too.
The error (taken from event logs) was:
System.Net.Http.HttpRequestException: An error occurred while sending the request. —> System.Net.WebException: The request was aborted: Could not create SSL/TLS secure channel.
So I looked at my Git for Windows version:
PS C:\Yip> git version
git version 2.14.2.windows.1
So I decided to upgrade – as I had been meaning to do this for a while.
So I downloaded the latest version for windows and 2.16.2
I then ran the same command – which prompted me for my GitHub username/password. I entered them and asked me for my 2 Factor password which I put in and hooray!! — it worked.
I successfully cloned the repo and can now do work for a client who has stuff stored in GitHub.