Azure Platform Series: Creating an Azure Container Registry – ‘registry_name’ must conform to the following pattern

This is another blog post in the series of how to #MakeStuffGo in Azure.

Background:

I am working on a client project that requires containerised applications – so we will be using Azure Container Registry.

I am using bash scripts to create the resources in Azure – so am using variables for all the things.

How to #MakeStuffGo with Azure Container Registry

Initially I had a Resource Group called AKS-RG as the client wanted their resource groups to have the function of what would be in there (in this case Azure Kubernetes Services) and -RG so that it was obvious it was a resource group.

So initially the script for the Azure Container Registry was:

az acr create \
--resource-group $RESOURCE_GROUP \
--location $REGION_NAME \
--name $ACR_NAME \
--sku Standard

Where I had the variables $RESOURCE_GROUP, $REGION_NAME and $ACR_NAME already defined further up in the script.

The only problem was – we had defined

ACR_NAME=acr-$RESOURCE_GROUP
which then failed in Azure Cloud Shell with:
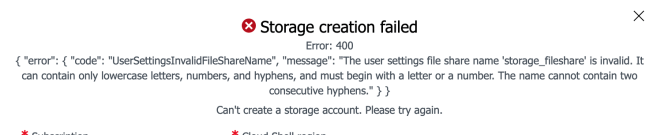
validation error: Parameter 'registry_name' must conform to the following pattern: '^[a-zA-Z0-9]*$'.

The fix was pretty simple – we just changed ACR_NAME variable to be:

ACR_NAME=acr$CLIENTNAME

Which to be honest was a better standard – as we already had the clientname defined as a variable.

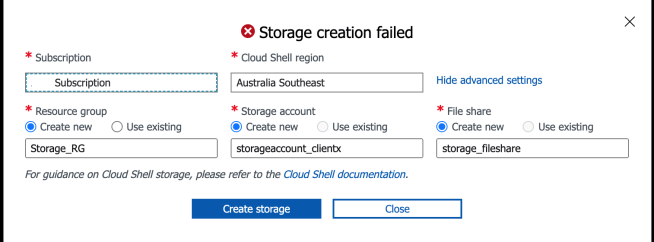
It is also the same in the UI (sometimes it is good to try this out as sometimes there are inconsistencies in Azure……)

Screen Shot 2020-06-07 at 17.54.22

So there you go – in some places you can use dashes in Azure and in some places you cannot. But that’s why we have prototypes – to find out all this fun stuff that keeps us on our toes..


Yip.

Advertisement

Azure Platform Series: Push to GitHub repo with 2FA from a Mac using Personal Access Token

This is another blog post in the series of how to #MakeStuffGo in Azure.

Background:

I have some code on my Mac. I need to put it into an empty GitHub repo for later deployment in Azure and I have to use a Personal Access Token (PAT). I was provided the URL of the repo and given the PAT so stored that in the keychain on my Mac.

#MakeStuffGo with PAT, GitHub and a Mac

  1. Add the PAT into Keychain:
    Screen Shot 2020-06-07 at 17.25.40
  2. Create the Project Folder on the Mac:
    heymish$ mkdir devops-aks-middleware-api
  3. Initialise the local git repo
    heymish$ cd devops-aks-middleware-api
    heymish$ git init
  4. Add the remote git repository – I have called mine origin – it could be anything
    heymish$ git remote add origin https://github.com/<clientrepo>/devops-aks-middleware-api.git
  5. Create a local branch
    heymish$ git checkout -b master
  6. Do some stuff
    For me I was just copying in code that we had worked on so far – so copied that into the directory and did:

    git status
    <list of files that I've added>
    "nothing added to commit but untracked files present (use "git add" to track)"
  7. Now we want to add those files to be added to our initial commit:
    heymish$ git add .
    heymish$ git commit -m "initial code commit"
  8. Now comes the hard part – getting the 2FA stuff going with GitHub.
    a) we need to setup the GitHub email address we’ll use
    b) we need to setup the GitHub username we’ll use

    heymish$ git config --global user.email "hamishwatson59@clientx.com"
    heymish$ git config --global user.name "TheHamishWatson"
  9. Now we will push our local changes to the remote branch.
    The -u flag indicates that we are pushing local changes upstream to origin

    git push -u origin master
  10. This will now ask me for credentials – which is the PAT I stored in the keychain before:
    Screen Shot 2020-06-07 at 17.19.36
    I type in the password for my keychain and I only click Allow – I’m ok to type in the password every time I need to auth to GitHub – I could click Always Allow – it’s just a personal thing.
  11. Git will now push my local changes up to the repository and I can now start to edit code and collaborate with my clients developers.

So there you go – not too hard and things are nice and secure. There are other ways to use GitHub – ssh vs https which I’ve done here. But for https the above method using a Personal Access Token is pretty straightforward.


Yip.

Azure Platform Series: How to setup Azure Cloud Shell

This blog post will be a series on the Azure Platform and some things we can use it for.

Background:

I run a consultancy company – and sometimes I have to build stuff for clients using their Azure subscriptions. Which means I get to help them setup their Azure platform.

I’ll write about the first thing you need to do when working with Azure – setup Azure Cloud Shell. I love the Azure Cloud Shell as it means I can stuff from anywhere, no matter what O/S, machine or location I’m in – I’ve been known to build data centres in Azure using my mobile phone whilst watching rugby on a field in Akaroa (seriously – Akaroa is a wonderful part of New Zealand).

But yeah – the best part of Azure Cloud Shell is that I have zero software to install or maintain – and I like that…

I can also load scripts up to Azure storage and reference them in Azure Cloud Shell.

#MakeStuffGo with Azure Cloud Shell

First up we need to go to https://portal.azure.com and login.
We now click the Azure Cloud Shell icon:

Screen Shot 2020-06-06 at 14.47.15

We can choose Bash or PowerShell – that doesn’t matter too much right now – we can always change it later.

And if this is the first time we’ve used it we fill out the form below – but be careful with your naming as you can get this:

Screen Shot 2020-06-06 at 14.45.26

The reason is has failed is:

Screen Shot 2020-06-06 at 14.59.32

So fir the Storage Account – just uses numbers and lower case letters only. No special characters.

But you also have to have a unique name for your storage account – not just your storage account but ALL storage accounts:

Screen Shot 2020-06-06 at 15.01.47

So make it something unique.

Oh and that File share name isn’t great either:

Screen Shot 2020-06-06 at 15.03.42

We settled on this:

Screen Shot 2020-06-06 at 15.05.15

And now we have:

Screen Shot 2020-06-06 at 15.05.52
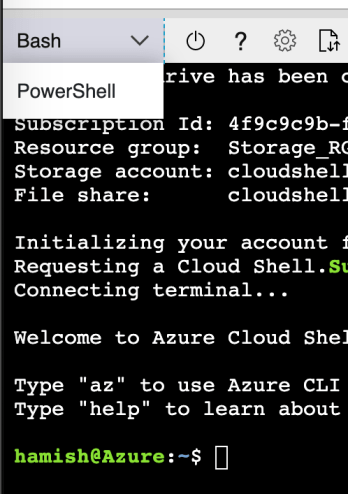
If after creating our Azure Cloud Shell session we want to change to PowerShell from bash or vice versa – it’s really easy:Screen Shot 2020-06-06 at 15.08.23

And there we have it – we have Azure Cloud Shell configured.
Now let’s go build some stuff in Azure!!

Yip.